Webflow Technical SEO Guide and Checklist

TL;DR:
- To make your Webflow site SEO-ready, optimize meta information, add alt tags to images, ensure proper heading structure, create clean URL structures, use and track internal links, optimize core web vitals, optimize for mobile responsiveness, enable auto-generated XML sitemaps, implement structured data markup, and connect to Google Search Console for page monitoring.
- Letterdrop is a tool that integrates with Webflow to provide advanced SEO optimization, including automatic technical fixes, internal linking, content refresh monitoring, and faster publishing. It also has a free programmatic SEO tool to help you scale faster with unique AI content.
Webflow has over 3.5 million worldwide users. A huge portion of those users being part of marketing teams. One of the biggest appeals for Content Marketers like you (aside from the promise of sleek and modern sites) is that it's a no-code website editor meant to eliminate technical headaches. Operative words being "meant to."
Webflow's CMS can still sometimes pose serious roadblocks to content teams, especially if they're used to WordPress and all those helpful plugins.
If you want to get ranking, you need to get optimizing properly — and to do that, you need a walkthrough of Webflow's SEO capabilities (and a companion SEO tool to help cover any gaps.)
That's where we come in.
What Webflow Can Do For SEO
Right about now, you're probably reminiscing about all those handy WordPress SEO plugins. And it's well-known that Webflow proudly sells itself as "not needing" plugins. So, what does it have to support built-in optimization?
- It's fast. Quick load times bring up your Core Web Vitals score and help you rank better, and Webflow helps you optimize for speed. Its sites are hosted on fast Content Distribution Networks (CDNs), it has lazy loading for images, and has an option to compress redundant code.
- It has a basic audit tool for technical SEO. The tool can identify missing alt text, skipped heading levels, non-descriptive link content, and broken ID elements on landing pages.
- You can edit on-page elements for SEO. You can edit meta titles, descriptions, and image alt text without code.
- It supports 301 redirects. Webflow makes it easy to ensure search engines don’t see different versions of your page as duplicate content, letting you set a canonical URL.
- It can auto-generate sitemaps. Sitemaps lets you and Google see all of your existing pages, and Webflow can sort this out for you.
It's important to remember that Webflow is primarily a site builder, so naturally there are some gaps in its SEO capabilities. Lots of companies use companion SEO tools to cover all their SEO bases.
TL;DR — yes, Webflow is good for SEO, assuming you get a couple of things right.
Checklist: Is Your Webflow Site SEO-Ready?
Here's all the technical SEO steps you can and must take on Webflow to make sure your site is optimized.
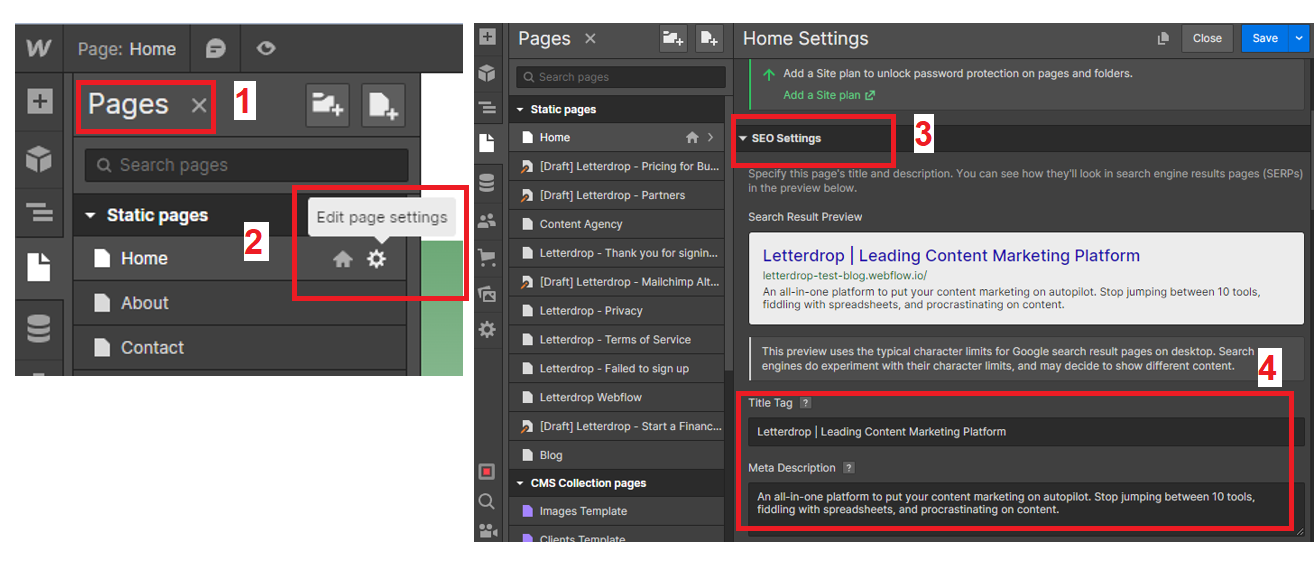
1. Optimize Meta Information
You can create and edit meta titles and descriptions without code using Webflow from the designer and the editor.
In the designer:
- Navigate to the Pages tab.
- Choose the Settings gear icon on the page you want.
- Go to the "SEO Settings" dropdown.
- Edit your meta title and description.
 |
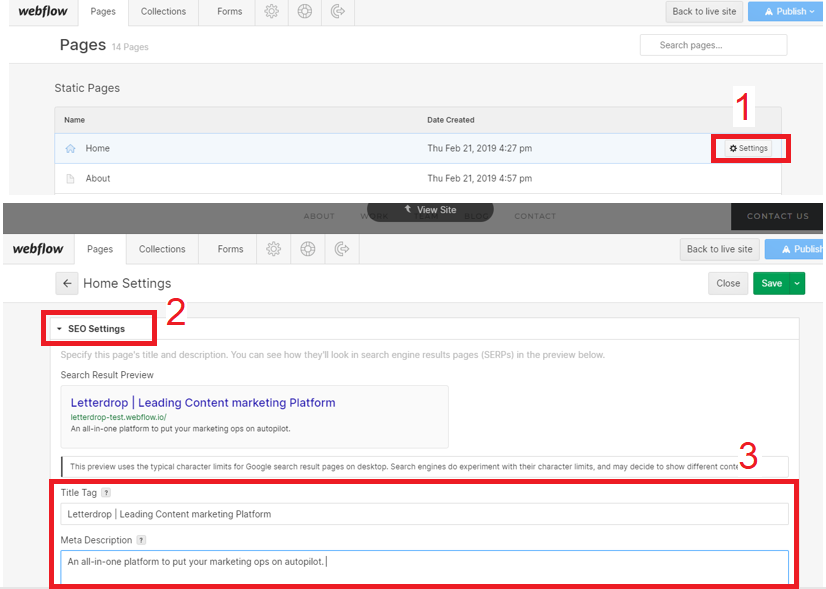
In the editor, you'll find the Pages tab at the bottom of the screen. Choose the Settings gear icon on the page you want.
- Go to the "SEO Settings" dropdown.
- Edit your meta title and description.
 |
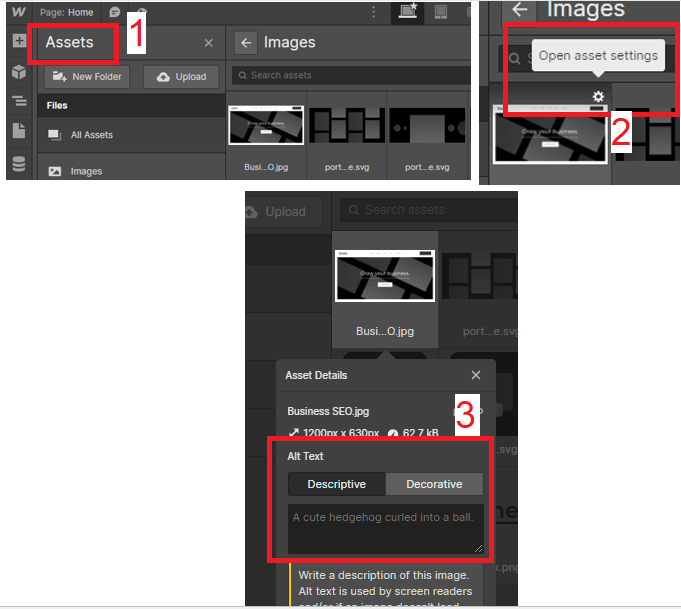
2. Optimize Images with Alt Tags
Alt text on images gives your users and Google a description of what the image is about.
In Webflow, the easiest way to edit alt text is to:
- Navigate to the "Assets" tab in the designer. Here you c
- an see all the images on your page.
- Hover over the image that you want to add alt text to and click the Settings gear icon.
- Enter your alt text.
 |
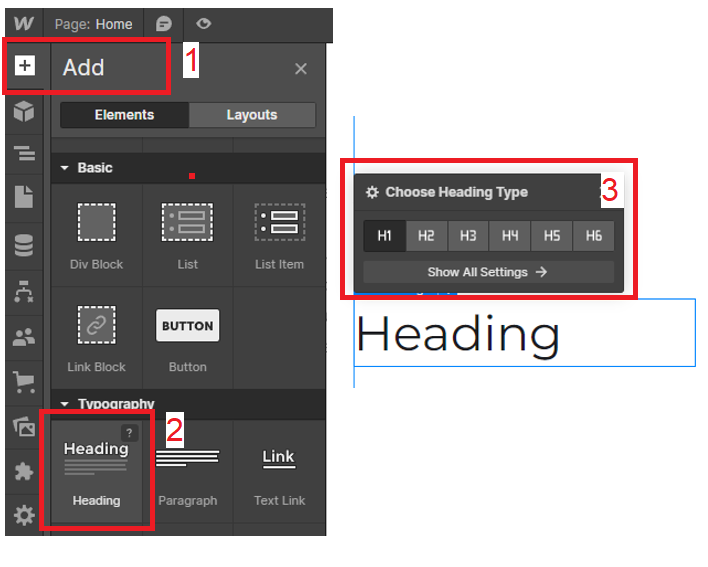
3. Ensure Proper Heading Structure
Structuring your article with headings like H1, H2, H3 etc, gives you a cleaner page structure and a better reading experience overall.
It's easy to assign heading tags to your content in the designer. You can either change an existing header tag on-page or add a new one using the "Add Element" section.
Changing an existing header tag:
- Double click on the heading and click the Settings gear icon.
- Choose a header tag.
 |
Adding a new header:
- Go to the "Add Element" tab.
- Click "Heading."
- Choose your heading tag and type your heading.
 |
4. Create Clean URL Structures
A clean URL structure can make for a better navigation experience for users, and it helps you rank for appropriate terms on Google.
You can edit the slug for individual page URLs and then create a parent-child relationship with an associated CMS collection (like a blog) in the Webflow designer.
To edit an individual page URL slug:
- Navigate to the Pages tab.
- Choose the Settings gear icon on the page you want.
- Add the slug.
 |
To create a subfolder on a parent page, first set up your collection URL.
- Click on the CMS panel.
- Create a new CMS collection or edit an existing one.
- Click on the Settings gear icon and enter a name for a URL collection.
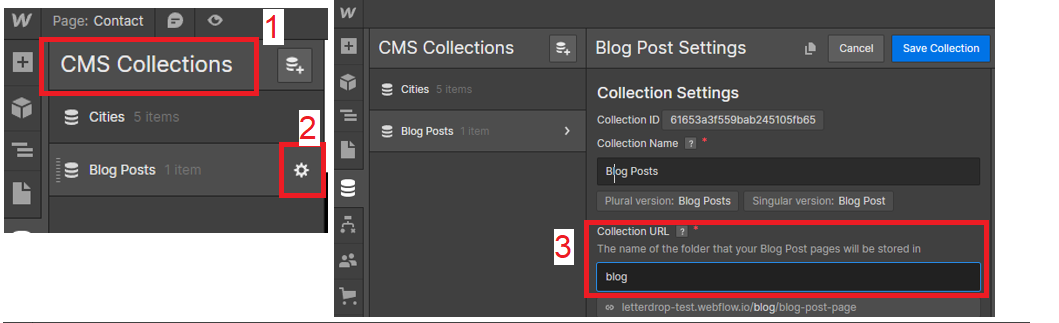 |
Now:
4. Select the collection.
5. Create or select an individual page you'd like to create a slug for within your collection. Keep your slug concise and related to your keyword.
 |
5. Remember to Use and Keep Track Of Internal Links
Internal links are like a roadmap through the valuable related content on your site. Without them, both your users and Google will struggle to find important pages.
Unfortunately, there's no way to keep track of internal links on Webflow other than through a spreadsheet. You need to update them regularly and link as many pages to one another as possible.
Adding internal links to your Webflow pages from the designer is easy:
- Go into your CMS collections.
- Go into the blog post you want to edit.
- Highlight the text that you want to add a link to.
- Click on the link icon and paste your URL.
The same steps apply for in-text CTAs in Webflow.
 |
Alternatively, you can click on "Link Type" > "Page" and choose the page you want to link to.
 |
6. Optimize Your Core Web Vitals
Here are some ways you can speed up your page loading times for better user experience:
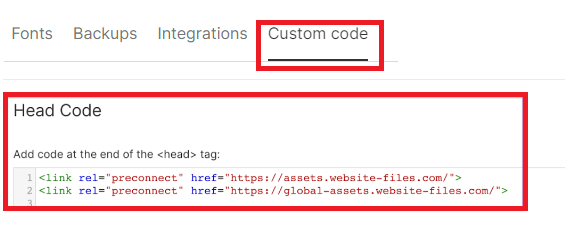
1. Use Preconnect Commands to Speed Up Font and Image Load Times. Custom font and images have quite the impact on loading times since Webflow has to retrieve the files. Instead of adjusting them manually, you can use the following copy the following code:
<link rel="preconnect" href="https://assets.website-files.com/" />
<link rel="preconnect" href="https://global-assets.website-files.com" />
<link rel="preconnect" href="https://fonts.googleapis.com" />
<link rel="preconnect" href="https://fonts.gstatic.com" />
To copy this into Webflow:
- Go to website settings.
- Select the "Custom Code" tab.
- In the section labeled "Head Code", paste the above links.
 |
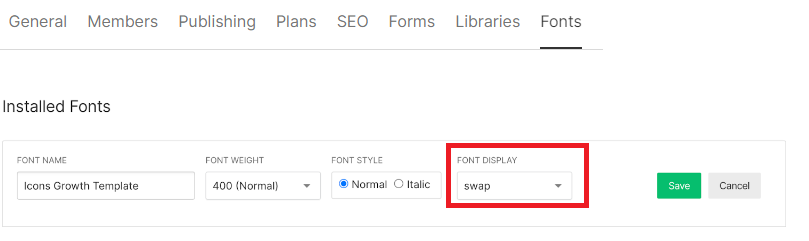
2. Set Fonts to "Swap" to help your website deliver a preloaded system font immediately while your custom fonts load.
In Webflow:
- Go to website settings.
- Select the "Fonts" tab.
- Edit each font and choose "Swap" for "Font Display."
 |
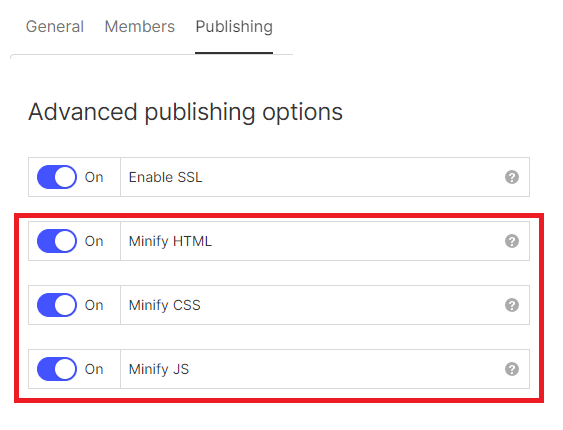
3. Optimize Your CSS, JS, and HTML by minifying them. This means removing unnecessary characters from the source code to dramatically increase loading speeds.
In Webflow:
- Go to website settings.
- Select the "Publishing" tab.
- For CSS, JS, and HTML options, switch Minify to "On."
 |
4. Monitor Any Third-Party Scripts. Limiting third-party scripts down to what you need will allow you to get the important things loaded first and speed up general loading time.
- Limit the number of third-party scripts to what you need.
- Consider delaying, deferring, or loading scripts asynchronously for faster loading times.
- Selectively load different scripts for mobile and desktop users.
5. Manage your Image Files. Images are often the largest files on a page and have long load times.
- Optimize your images by using responsive images and file formats like WebP.
- Compress your image files to make them faster to load.
6. Set Attribute Dimensions to Your Images and Videos.
- If you don't set dimensions for images and video, the user's browser will have to wait until it loads the image before it can render the page, which may cause sudden jumps or shifts.
- Here's a code example of how to set specific dimensions for your images:
 |
7. Accept Suggestions from PageSpeed Insights
Google's PageSpeed Insights tool provides feedback on your FID (First Input Delay) score. So it's a good idea to take note of its recommendations to improve your page's performance metrics.
 |
8. Monitor Your Animations. Evaluate if animations impact above-the-fold loading times and adjust accordingly.
- Consider removing unnecessary animations to serve content faster.
- Only keep animations that are essential for enhancing the user experience.
7. Optimize for Mobile Responsiveness
Studies show that over 55% of web traffic comes from mobile devices — so you want to be optimizing for mobile users if you want to reach an even bigger pool of prospects with your site.
Webflow lets you do this intuitively in the designer.
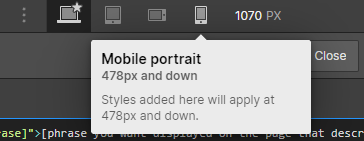 |
Here are some ways to make your Webflow pages mobile-friendly:
1. Make sure you keep navigation functional.
- Compress buttons and menus for limited space on smartphone screens.
- Design finger-friendly buttons and prominent search bars for easy navigation.
- Emphasize important navigation elements like CTAs.
2. Create consistent content across desktop and mobile.
- Use designs that present information in the same places on both desktop and mobile.
- Limit pop-ups to avoid disruption.
3. Take advantage of mobile features.
- Use location services for serving location-based content or targeted ads.
- Consider download speed and opt for a minimalist design to enhance the mobile user experience.
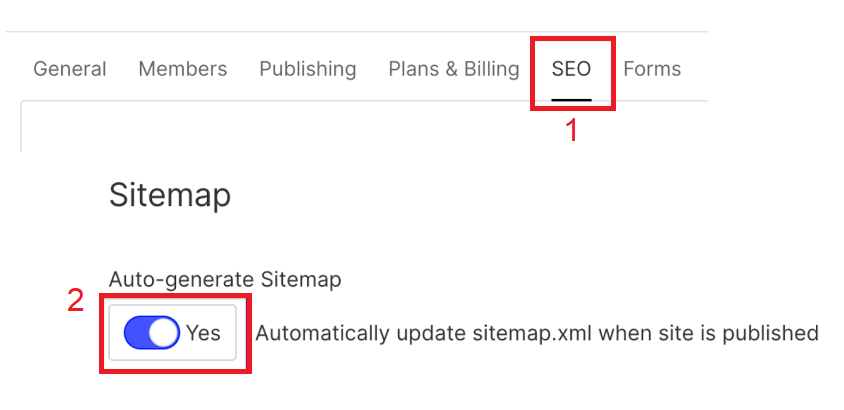
8. Enable Auto-Generated XML Sitemaps
XML sitemaps are super useful to both you and Google. You're able to see all of your sites, and Google will be made aware of your most recent URLs.
Webflow lets you generate a sitemap automatically. All you have to do is enable the setting by going into your website project settings. Once there:
- Select the SEO tab.
- Set automatic XML sitemap to "On."
 |
9. Implement Structured Data Markup
You can add schema markup to your Webflow pages all by yourself without the help of an engineer. It's a type of structured data that provides additional information to search engines about the content on a webpage.
Here's how:
- Navigate to the Pages tab.
- Choose the Settings gear icon on the page you want to add schema markup to.
- Scroll down to "Custom Code - Before </body> tag" and insert your code.
 |
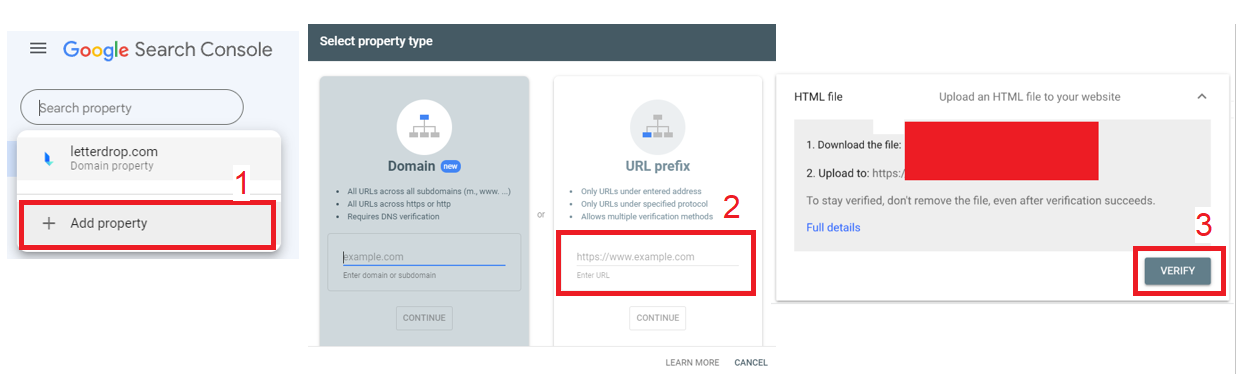
10. Connect to Google Search Console for Page Monitoring
Google Search Console (GSC) can help you keep an eye on page performance once you've published, and help you find areas for technical improvements.
To connect your Webflow site to GSC, you'll first need a site verification code from GSC. To do that:
- Click “Add property” in GSC.
- Under the URL prefix column, enter your domain name.
- You'll be prompted to download an HTML file. Click "Verify."
- Copy the HTML snippet to your clipboard.
 |
Now, go back to Webflow and:
- Go to your website project settings.
- Select the SEO tab.
- Scroll down to the field for “Google Site Verification” and enter the site verification code you copied earlier.
 |
So, that about covers us for technical SEO. But a couple of optimized pages won't be enough to make a real impact on your incoming traffic. For that, you need lots more SEO pages.
How To Create More SEO Blog Posts, Faster, on Webflow
Let's face it — for a "no-code" web builder, there sure seems to be a lot of code and technical barriers on Webflow. And this can really slow down your entire content pipeline.
Now imagine you want to scale your SEO pages. Roadblocks like manually tracking internal links with spreadsheets and taking care of on-page tech SEO fixes yourself will really start adding up.
Luckily, there are tools out there that can help you optimize content much quicker so that you can focus on scaling. Enter Letterdrop, which directly integrates with Webflow for a much more user-friendly (and streamlined) SEO optimization experience.
The SEO Assistant
While the Webflow audit tool alerts you to minor technical SEO errors, Letterdrop can run your content through over 60 technical SEO rules and even automatically fix some of them for you.
Beyond automatic technical fixes, the tool semantically understands your content and can:
- Identify Search Intent and let you know you whether your search is informational, navigational, commercial or transactional. It scans top pages and suggests the best format you should use to get ranking.
- Provide insight into what has been covered on the SERP in the Tablestakes section so that you know what needs to be covered. You can auto-generate sections into your content.
- Suggest topics and new angles that haven't been covered yet so that you optimize for Information Gain. You can auto-generate sections into your content.
- Analyze and compare your content to that on top pages, giving you comparative data on word count, keywords, headings, and media usage. You can auto-add the suggested headings to your own text.
- It gives you an EEAT guide specific to your content to make sure all your bases are covered.
Here's a quick rundown of the tool by our writer, Keelyn, and how she uses it to help outline and optimize content.
Automatic Internal Linking
Unforunately, Webflow isn't able to automate your internal linking without help from third-party tools. If you're looking for possible pages on your site to link to, you'll have to type "sitemap: [yourdomain.com] [possible page name]" into Google. Not particularly helpful if you've forgotten about related pages that could be important.
Letterdrop can help you identify and automatically add pages from your site, both in the editor as you're writing and in bulk across your pages.
Here's how it looks in action.
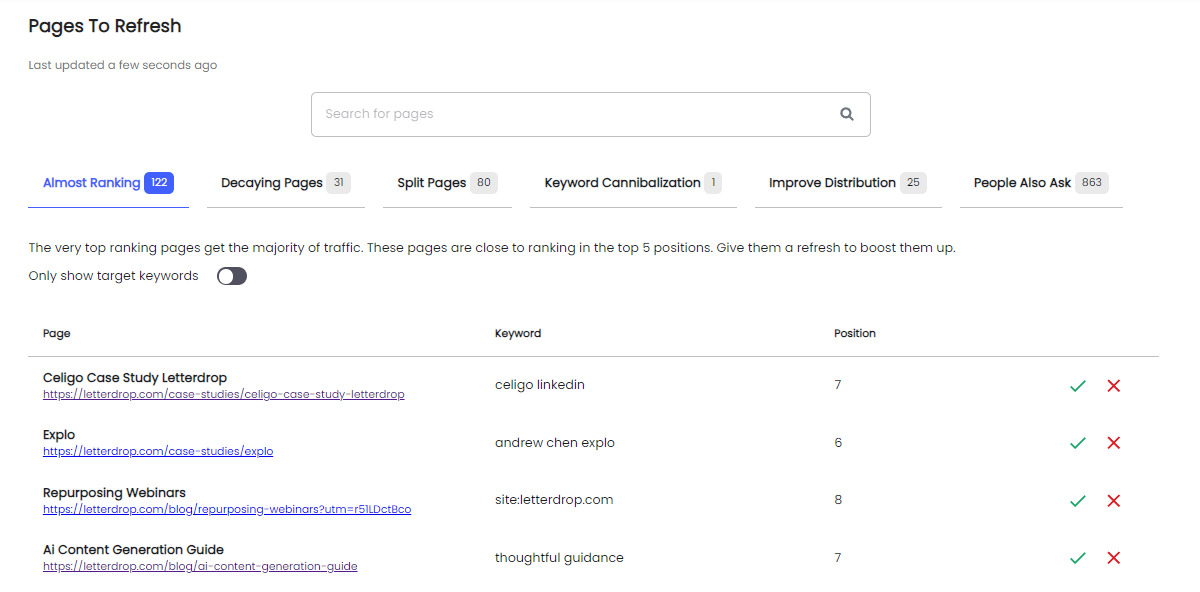
Automatic Content Refresh Monitoring
To save you having to connect your Webflow site to Google Search Console and comb through your pages manually, Letterdrop integrates directly with GSC. It gives you an up-to-date look at which of your pages need an SEO refresh, including:
- Pages that are almost ranking
- Pages with declining traffic
- Pages that need to be redistributed
- Pages falling victim to keyword cannibalization
- Pages that have opportunities to rank for "People Also Ask" snippets
 |
Bonus: Faster Publishing
After speaking to over 121 companies, we've learned that on average, teams lose 1.5 hours per post on Webflow publishing. This is mainly due to the fact that content writers don't have technical backgrounds, and many steps (like adding CTAs and previewing a page) are just that: technical.
Letterdrop helps bring Webflow to parity with WordPress when it comes to publishing.
- You don't need code to add embeds or anchors in Letterdrop, which is often a barrier for writers.
- You can safely preview posts without accidentally breaking your Webflow site.
- You can easily add code for developer sites with its native support for Markdown and syntax highlighting.
How To Create More Programmatic SEO Pages on Webflow
Okay, if you want to take scaling pages to the next level, you have to turn to a programmatic SEO campaign.
If you're unfamiliar with programmatic SEO, it allows you to create hundreds of thousands of keyword-targeted pages for your site. Unlike traditional SEO methods that involve manual content creation, programmatic SEO leverages data and automation to generate thousands of pages with the same goal of ranking on the SERP.
The key to programmatic SEO is the use of a template and a database. You can create your database with a spreadsheet, and upload it as a CSV file to Webflow.
Here's how to set up a design template for your programmatic pages on Webflow, supposing your dynamic content would be different locations or cities:
- Choose a free Webflow site template to work from.
- Create a CMS collection where all your programmatic data will be stored. For this example, we created a CMS collection called "Glossaries."
- Go into Settings for that CMS collection and add custom fields for the variables that you want to modify for each programmatic page. For example, Location.
Here's a video demonstration of this step.
4. Design your template page. Fill in any text or data that will be common across all pages. Then insert your variables in the relevant spots of your template. Just click on the settings icon next to an element and click on "Get text from" your collection.
 |
Suppose you want to populate your pages with unique AI-generated content instead of just variables. It certainly helps you answer search intent better, especially if you marry proprietary it with proprietary data.
One way to do this would be to use a formula to populate your spreadsheet with OpenAI results. But Letterdrop has a free programmatic SEO tool that does this for you.
It can help you automatically generate thousands of AI-written articles based on a CSV file of your selected keywords and unique data. The result goes straight to your inbox, or you can choose to put in a prompt and get a more personalized result.
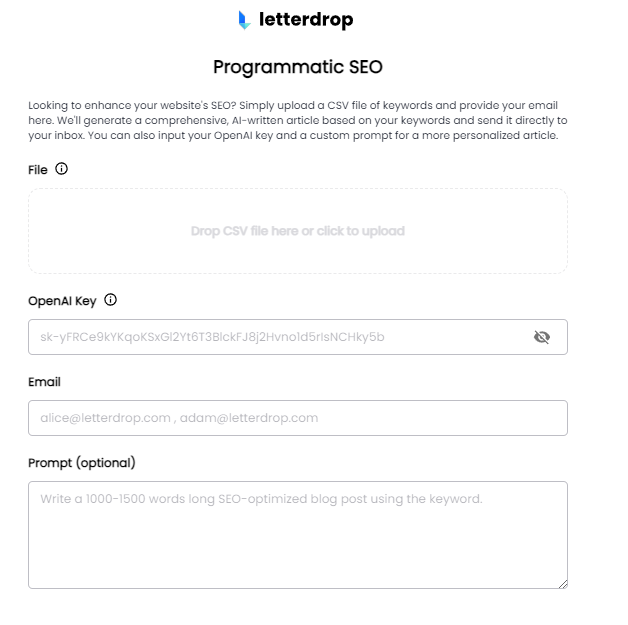 |
Here's a quick video overview of how to use the tool.
Use SEO Tooling From Creators Who Know Webflow
In order to take your Webflow SEO from good to great, you need to take on an SEO tool that will actually get you ranking in the shifting search climate and can help you scale those SEO pages.
Better ranking means more qualified traffic, and it's not long before the conversions start rolling in. Hopefully, this guide can help you optimize your Webflow pages from top to bottom at scale.
We help hundreds of marketing teams bring their Webflow sites to parity with WordPress. If you're looking to do the same, feel free to reach out to us.
Subscribe to newsletter
No-BS growth strategies and content marketing tactics in your inbox twice a month.
Related Reading
Some other posts you might find helpful